- Mark as New
- Bookmark
- Subscribe
- Mute
- Subscribe to RSS Feed
- Permalink
- Report Inappropriate Content
10-30-2021 09:22 AM (Last edited 02-14-2022 06:37 PM ) in
CreatorIf you need specific explication, don't be shy and ask me on this post !
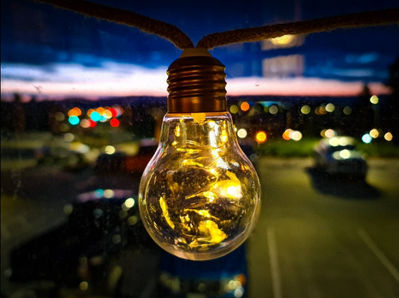
Hey, you hnow, Professionnal pictures can be done at Home, just light up !
Article 1 of 5
If you like this article, do not hesitate to click on LIKE because it encourages me to continue.
For better viewing, go through your favorite browser and enlarge the photos:
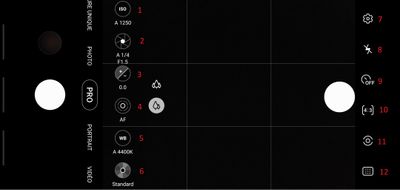
Here are the different icons that I will explain to you:
Articles currently available:
- Here is how to add color to a "Black and White" photo ...
- The Rule of Thirds from which all professionals photographers are inspired to succeed in their photo
- Make photo montages with Samsung's photo editor and have fun !!!
- Do not hide your XXX, show them to us
- What to do if your device does not provide adequate photo magnification ...
- How to achieve 100X photos even if your device does not allow it !
- Can we take professional quality photos with a smartphone when there is a lack of lighting
- Pro Mode finally explained here !
- Filters and Styles of the Samsung editor and Become an artist !!!
- Your children will love to color your own photos !!!
- A photographer with a unique vision in my opinion
- BLUE hour and GOLDEN hour are magical hours in photography
If you have any questions, please feel free to ask them to me so that I edit the article until it is clearer to you.
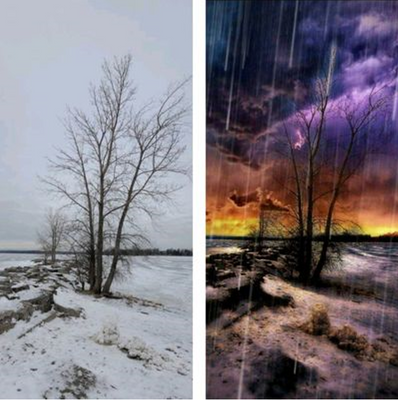
Note that only a photo taken in Pro mode allows you to go from this to this:
To see all the beauty of the image, click on them to enlarge them ...
Courtesy of Darren C. Walker, photographer.
(programs used Lightroom, PixlR and Camera 360 for Android)
Best Photo Editing Apps for Android or iOS:
- Snapseed. ... (similar to Lightroom but it's free) # 1 on my list
- Adobe Photoshop Lightroom. ...
- Adobe Photoshop Express. ...
- Prisma Photo Editor. ...
- Bazaart: Photo Editor and Graphic Design. ...
- Photofox - Photo Editor. ...
- VSCO Cam. ...
- PicsArt - Photo Studio.
- Pixlr
- Samsung Editor
In post editing when you took a picture in Pro Mode, you can go from a ordinary picture like this,
To a better picture like that : (Look at the Clouds),
This is what the camera see in Pro Mode, but not your eyes
From my album 😉
or you can just play with it for fun:
Courtesy of Darren C. Walker, photographer.
This can be done easely with application like Lightroom , Snapseed (free), Raw Therapee (free) and it makes a ordinary picture to a more professionnal picture. TRY IT !
When we take a photo in Pro mode, we can modify ALL the parameters of the photo, whether it is the contrast, shadows, highlighting, saturation, shades, temperature etc ... an ordinary photo something extraordinary and all of this is possible with RAW photos taken with your camera. Since I'm not a pro and only edit photos every now and then, I only use FREE programs like Samsung's Editor and Snapseed to play around with the settings listed above.
If you venture to try Pro Mode in the evening OR the night before I finish the article, be sure to have a tripod handy and keep in mind that the ISO number should always be on. the number 100. To have this number, (1) you click on ISO, switch to Manual mode and choose 100. Then you will have to click on the icon representing the aperture and the chosen time or if you prefer the term "speed" (2) for the aperture of the diaphragm to capture your photo. You can choose between 1 / 24,000th of a second and go up to 30 seconds of exposure. No need to repeat to you that a tripod could be used for long exposures ...
For better viewing AND to see ALL photos, open this post in your favorite browser at this address:
Some photos are impossible to take because of the low light in the scene and trying to take the following photos in Night Mode would have been useless as the exposure time was too long to take a photo with the hands up, hence the importance of the tripod. and Pro Mode
So here's a quick little lesson where I might not use the terms professionals use so you understand. So I will try to use terms that you will understand.
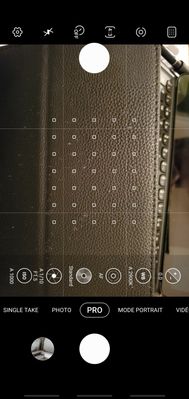
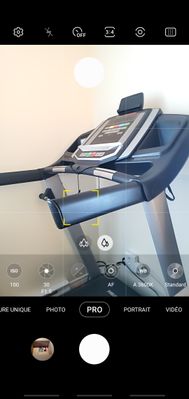
Let's take the following screenshot in Pro Manual Mode and compare it with the previous photo which is meant to be a screenshot taken in Pro Automatic Mode. We immediately notice that the device has chosen IS0 1250 ... It could therefore be that there is a little grain in the image ...
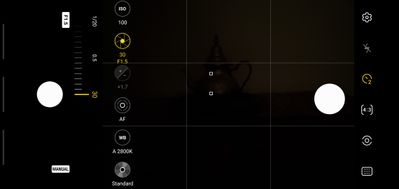
On the second screenshot, we immediately notice that the photo, which will be taken with the figure recommended by the Pros is ISO 100 , will be Overexposed because the device gives me the number + 1.7 while a perfect photo should show the digits 0: 0. This indicates that the exposure time chosen is too high, so instead of 30 we could try 15 and see if the counters are at 0: 0.
To have the best possible photograph with the most details and the least noise in the image (ink on your hands) assume that in Pro Mode the ISO number should always be on the number 100. We don't succeed. not always but we can compensate in other ways to still have a good result. You just have to understand how it works.
The Pro Mode is not really made for for picture as auto racing unless you have defined in advance speed from 1/1000 th of a second to 1 / 24,000ième of seconds " freeze ”the image.
You have surely noticed that the A on the 1,2 icons has disappeared and that on my photo, we can now see the word Manual ... I did not however deactivate the AF (Auto Focus) icon nor the WB (White Balance) icon because it is more difficult to handle in such a dark environment.
When you understand the Pro Mode, you can get the following result thanks to the tripod! This is the photo I took when we could barely see the Image on the screen of my Note10
This photo was taken when we could hardly see anything, refer to the screenshot where 2 collimators are lit (the 2 white dots on the teapot barely visible)
So, let's begin the description and function of each of the icons I numbered above and try not to get too technical.
1/5
This is a Google Translation, so if you find something strange, just advertize me
- Mark as New
- Bookmark
- Subscribe
- Mute
- Subscribe to RSS Feed
- Permalink
- Report Inappropriate Content
10-30-2021 09:23 AM (Last edited 10-30-2021 11:15 AM ) in
CreatorReserved 2/5
Follow the road and together let's talk about what you are so afraid
Courtesey of Stephen Berthelot Photographer NB
So, let's begin the description and function of each of the icons I numbered above and try not to get too technical.
Pro mode finally explained Part 2
1 = ISO = Sensitivity (Icon 1)
Whatever photo you take in your life and on any device, there will always be an ISO number in the description of the photo that tells us the level of sensitivity that the device has chosen in order to be able to take the picture. The higher the number, the more sensitive the sensor becomes and the greater the possibility of having large, not beautiful pixels in the photo ... it's called grain (let's explain it the same)
Imagine the following scene where the pressure of your hand will be representative of the ISO number:
- If you only put a little pressure on putting your hand on carbon paper, your hand is unlikely to be stained with ink so it looks like the ISO figure is very low so numbers like 50 or 100 would be representative and your hand will look crisp and clear like all photos taken with a low ISO number.
- Likewise, imagine that you put a lot of pressure with your hand on the carbon paper, then it is possible that your hand (the photo) is stained and this is normal.
- The more pressure you put on the carbon the more likely you are to get ink on your hands. It would represent a high ISO figure and you would have grain in your photo (like in the example, ink on your hands)
So to see great photos in Pro mode, it is best if you have the lowest possible ISO number. PROS always try to keep the ISO figure at 100 (Icon 1) by using everything possible to achieve it, namely: speed, aperture, filters and others ... we'll talk about it later!
We could also compare it to the sensitivity of your screen ... the more you weigh, the more your fingerprints will appear on the screen (photo)
2 = Opening and Speed (Icon 2)
On my Note 10+, I am lucky to be able to choose the aperture of the diaphragm which normally determines the depth of field on Reflex, Hybrid or Digital cameras.
Well, let's be clear, F 1.5 or F 2.4 (icon 2) are apertures that won't really make a big difference when the object is far away compared to digital cameras on the market that go up to F 22 and above, BUT in some situations I am happy to have this choice because it influences the depth of field and can make all the difference between part of the subject which will be BLUR or not .. the smaller the number, the less depth of field you will have.
You will certainly ask me: What is depth of field? In fact, when you Focus with an object / person / insect close to you, you will often notice that you cannot discern all the details of the insect / object because the further away you are from the Focus The further the subject becomes. becomes BLUR and this is what happens on all devices that have small F numbers (ex: F 1.5) while this Fuzzy exists less and less when the F number grows and sometimes a photo is missed / reduced because of the small centimeter that we could have had more.
Take a good look at the following 2 photos, they were taken under the same conditions with my camera on a tripod without modifying the focus that I had chosen at the start ... I'll let you judge the result ...
Photo 1 taken with aperture F: 1.5 and photo 2 with aperture 2.4 on my Note10 +
F: 1.5 ----- only 1 rock is really clean
F: 2.4 More than 4 rocks are clear and not blurred because the depth of field is greater thanks to the opening which is different
Closer still, we can see the difference ... look at the sharpness of the rocks and how deep the field goes ... F 1.5 vs 2.4
F: 1.5
F: 2..4
SPEED, you can freeze a picture or make the picture as soft as Cloud
Fast speed can give you this :
Less speed will give you this :
Look how soft the water is...
1/4 second is tsometimes oo long to take photography without a tripod
Do you see a difference when changing the opening/speed ?
On a VERY sunny day, we would like there to be less light entering the sensor as this often causes the photo to be overexposed (too bright) and the depth of field is not necessarily what we want. . Note that in PHOTO Mode, photos are less likely to be Overexposed or Underexposed if you have enabled HDR. On the other hand, you will be able to correct that easily once you understand the Pro Mode ...
It would be a real revolution if Samsung created filters limiting the light entering the sensor and it wouldn't surprise me if this is what they are going to present on the new S 22 Ultra. This would also allow us to take longer exposures while having the desired depth of field.
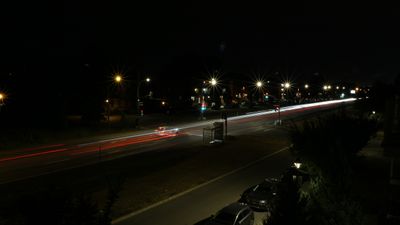
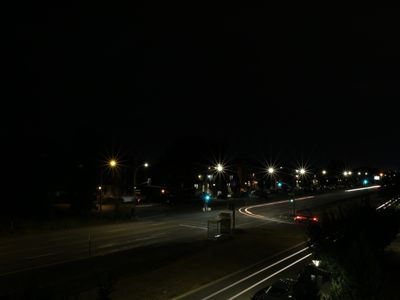
The following two photos were taken with long exposure times of 30 seconds. We can clearly see the light trails as well as the movement of vehicles. Long exposures = mandatory tripod
Light trails pose 1
Light trails pose 2
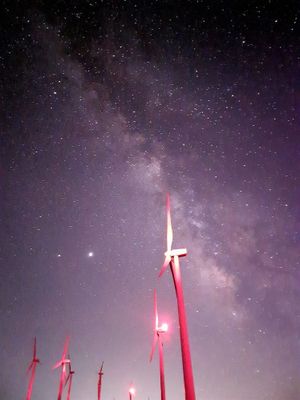
The superb photos of the firmament are also made with long exposures ... and a tripod.
You can do this on all devices in Pro Mode by doing a long exposure of several seconds or minutes depending on your device! Learn the How to with this article from Samsung's Users. You can do this with any of your Samsung's devices until you use Pro Mode and a tripod.
Icon 3: one of the most useful icons
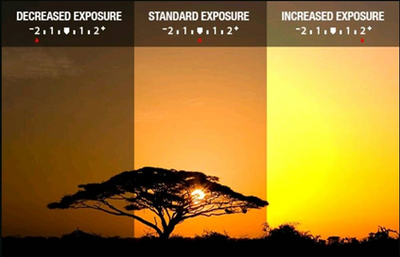
Icon 3 is certainly the most useful one because it tells you if you are going to have an Overexposed photo (+ = too light) or an underexposed photo (- too dark) and it helps you determine if the time to pose chosen is the correct one. For example, if you see +2, it means that your image is overexposed by 2 F-stops and it will be too bright, you will lose details in the highlights where there is too much light and vice versa if you see -2 it would mean your photo will be underexposed so too dark and you won't see some detail in dark areas. So when making your adjustments always try to see the counters at Zero which will tell you that depending on the camera the camera will be perfect ... EXCEPT if you want the photo to be over or underexposed.
Examples of exhibitions
An HDR photo is the result of assembling 3 photos: an Over-exposed photo, an Under-exposed photo and a normal photo that are stitched together but only the well-exposed areas are kept. There should (in principle) not be over or under exposed areas. In Pro Mode, you can play with shadows and / or light effects to create your own composition and demonstrate your creativity.
Remember this: Pros always try to keep the ISO number on the number 100. (1) ISO 100, (2) Set the speed until you see the number ZERO in the number 3 icon. .
It is better to change the speed to keep ISO 100 rather than increasing it too much and having grain in the image in an ideal world. On the other hand, it is possible that you do not succeed and that you have to increase the ISO number to succeed in the photo. Try not to exceed ISO 3200
2/5
Part 3 will follow
- Mark as New
- Bookmark
- Subscribe
- Mute
- Subscribe to RSS Feed
- Permalink
- Report Inappropriate Content
10-30-2021 09:23 AM (Last edited 10-30-2021 03:29 PM ) in
CreatorReserved 3/5
We have reached icon # 4 Auto-focus
As its name says, by selecting this option, the focus is done automatically ... On the other hand, there is a direct interaction with icons 11 and 12 which determines how the focus should be done. By default, the focus is in the center of the image BUT take into account the 35 collimators (Note10 +).
You can also choose WHERE the focus will be by clicking in the image. At this point, you will see a square indicating where the focus will be and if you have enabled the TRACKING option in the camera settings the focus will be done even if the subject is moving.
You can also decide to focus MANUALLY by clicking on the # 4 AF icon and then adjusting the focus with the slider at the bottom of the screen. The area where you want to focus will turn GREEN as long as you keep your finger on the slider. When you are satisfied with the focus, all you have to do is press the shutter button.
Personally, on my camera, I prefer to let the camera decide especially when there is very little light ... When there is no light, we can take a flashlight to facilitate the focus.
# 5 white balance
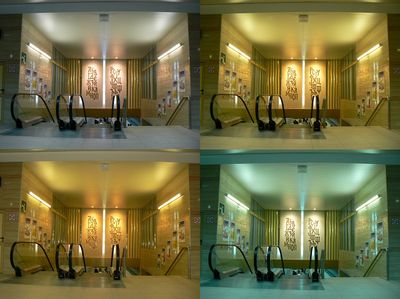
Depending on the type of lighting, the photo may look different from what the human eye sees. It can be cooler (bluish) or warmer (yellow). You can then choose between 2300K and 10,000K to decide the shade? color ? end of your photo knowing that a tungsten light is different from a fluorescent light which offers warm or cool colors depending on your needs. The following image was taken from Wikipedia to illustrate my point.
White balance is used to make your photos look more natural.
Results according to the chosen light
By Spiritia, CC BY-SA 3.0, https://commons.wikimedia.org/w/index.php?curid=7812886
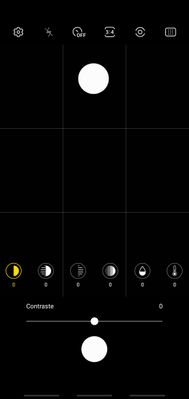
# 6 Standard
In Pro Mode, you have an almost endless choice of shooting possibilities and it's a world worth exploring ... You can take photos in Standard / Normal or the option to play around with them. Contrast, Highlight, Shadows, Saturation, Hues and Temperature and all that, simply by clicking on the Standard icon. I will not explain each of these opyions at this time, but I will come back to them later. So I suggest you test each of these options. I give here quick definitions.
Contrast = Opposition of two colors, one of which brings out the other.
Highlight : greater brightness highlighting the photo
Shadows = Reducing or increasing the shadows of an image
Saturation = Saturation corresponds to the intensity of the colors, we can increase or decrease them.
Shades = a very small difference in color, tone, meaning; subtle difference.
Temperature = similar to white balance, makes your photos cooler (bluish) or warmer (yellow)
Now let's go to settings # 7,8,9,10
- Mark as New
- Bookmark
- Subscribe
- Mute
- Subscribe to RSS Feed
- Permalink
- Report Inappropriate Content
10-30-2021 09:23 AM (Last edited 10-30-2021 04:01 PM ) in
CreatorReserved 4/5
# 7 Camera settings
As you will notice in the settings of your device, several options have been disabled because these options are incompatible with Pro Mode
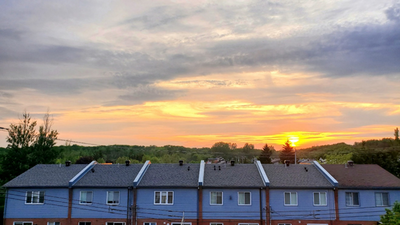
Only those which are important were retained, the 2 most important being the Grid which we will discuss again in the article on which I am working: The rule of thirds. The following photo was taken respecting this grid.
Have you ever realized that professional photos rarely place the main subject in the center of the photo ...
Imagine a grid of the TIC-TAC-TOE game, this grid divides your future photo into 9 parts (so 9 thirds or if you prefer 3 horizontal sections and X 3 vertical sections). the photo you will take and there are lines or intersections that will also help you position your subject.
In this photo, The row of houses represent the horizontal First Third, My horizontal Second Third is represented by the section that covers reflections from the Sun and my horizontal Last Third represents The Clouds.
Now my Vertical First Thirds emphasizes the trees on the left, my Vertical Second Thirds doesn't really catch the eye BUT the vertical Third Thirds, I have placed the Sun on a line of intersections in order to attract your eye and the Third Tiers Verticals is meant to be a repetition of what had been brought to the vertical foreground (ie the trees) to balance the scene.
You will also notice that I also took the time to properly align the skyline of the houses.
# 8 Flash is gone If you noticed, Flash is disabled in Pro Mode and this makes sense since with Pro Mode you decide all the settings.
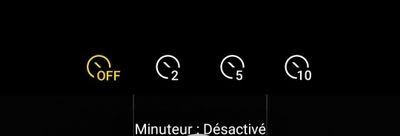
# 9 The Timer
The timer exists for several reasons:
- Either we don't need it since it is possible for us to take a photo with a show of hands. (OFF)
- Either, we can not take the photo with hands free and since the camera is placed on a tripod, we want to avoid the slightest blur of moving. (2 sec)
- Either we give ourselves time to avoid being in the photo OR to prevent our shading from being present in the photo (5 sec)
- Either we give ourselves time because we want to be part of the group photo or simply be present in the scene. (10 sec)
- Mark as New
- Bookmark
- Subscribe
- Mute
- Subscribe to RSS Feed
- Permalink
- Report Inappropriate Content
10-30-2021 09:23 AM (Last edited 10-30-2021 08:26 PM ) in
CreatorReserved 5/5
You want to make picture like this ?
Yoshi my cat
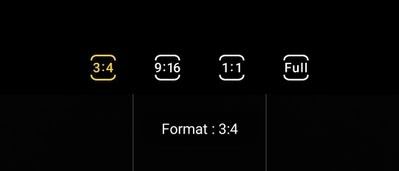
# 10 Which format to choose and how to use it!
To put it simply, I would tell you that the decision to use this or that format depends on what you want to do with your photo.
- 3: 4 aspect ratio Do you want to print your photos? If the answer is YES, you should use this format because it is the size of the captor/sensor and it is the format which records the most informations of your image.
Kuriouskiwiphotography on Facebook
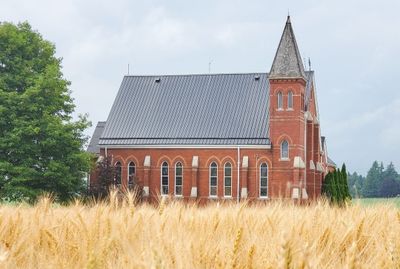
- 9:16 format: This is the preferred format for landscape photography and it is the one that best suits your television. You can use your photos to make wallpapers, this format is probably the one you should use, this photo is a good example.
Sully Photography
- 1: 1 format allows you to make square photos, it could allow you to print photos on canvas or frames that you will hang on your walls. It is also the preferred format if you want to place your subject in the center of your photo and make it stand out. (photo Jef Canton )
Jef Canton photographer
How to put colors in a Black and White photography here :
# 11 The different measures explained on which your device relies to take the photo
- Center-weighted measurement =
brightness is measured primarily in the center , but the rest of the image is also taken into account.
In other words, the camera measures light on the entire image, but gives more weight to measurements made in the center than to those taken at the periphery. I - Matrix measurement: this is the default mode used by your device, the one that measures the brightness over the entire image. Moreover, it is only with this type of measurement that you are allowed to select the place where the focus will be and the place where you want the luminosity zone to be taken Look closely at this icon, you will see that it divides into 2. This is very practical when we are faced with a light source that is too bright or not bright enough, this function allows us to tell the device which light source to choose in the image .
- ..
- Measure Zones (to be defined)
# 12 Multiple collimators or single collimator, which one to choose?
- MULTIPLE autofocus zone : You've probably got it, this icon will allow your camera to focus using the 35 points we talked about above
- Zone of autofocus in the CENTER This measurement is ideal when placing the subject in the CENTER will allow you to make better Bokeh
I will finish this article TOMORROW
- Mark as New
- Bookmark
- Subscribe
- Mute
- Subscribe to RSS Feed
- Permalink
- Report Inappropriate Content
05-19-2022 05:14 PM in
Creator- Mark as New
- Bookmark
- Subscribe
- Mute
- Subscribe to RSS Feed
- Permalink
- Report Inappropriate Content
09-29-2022 07:34 AM in
CreatorAn amazing thought you are exploring. wows I love to see them again
